Showing posts with label Beans. Show all posts

Thursday, July 8, 2010

Beans of Awesomeness (with Greens)

I recently found Super Natural Cooking by Heidi Swanson at our local library and spent an evening curled up with it on the couch. It's filled with luscious images that make you want to spend the day cooking (and eating). But as soon as I spotted this simple side dish using chard, I knew which recipe I would be trying first.

The official name is Giant Crusty and Creamy White Beans with Greens. I've affectionately renamed them the Beans of Awesomeness. Because that is exactly what they are.


I wish I were a better food photographer, so I could capture how delicious this dish is. The beans have a textured, almost crunchy outside with soft centers; the flavor of the greens quietly blends in among the garlic and olive oil. What's more, it uses simple, easy to find ingredients.

The author cautions against using canned beans, which apparently don't hold up well to sautéing. So sometime the day of or in the few days before, you'll want to cook up one-half pound of large dried white beans (notes on how to cook dried beans).  I failed to think about the beans the night before, but got away with soaking them for five hours and cooking for one. I added a shallot to the stock pot just to make things a little more interesting.

From there, it all happens in a single skillet. Fair warning: you need a large skillet.

Sauté in butter or oil in a single layer
(this was too crowded)
Flip when beans begin to turn
golden and crusty
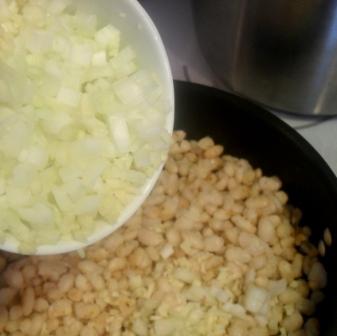
Add onion and garlic
Add chard, cooking just until wilted
The cookbook suggested serving the beans "over grilled slices of rustic bread rubbed with a clove of garlic and a fragrant extra-virgin olive oil." A homely bruschetta, if you will.


At this point in the meal, conversation stopped. Because we were too busy scarfing down tasty bean-topped bread.

The Husband declared he would happily serve the Beans of Awesomeness to guests. I heartily agreed. And in our house, that's about the highest compliment a dish can get.

Recipe below; printable version here.

Thursday, July 1, 2010

Pasta With Beans and Greens

I had never tried pairing pasta with beans as a main dish until earlier this year. (Pasta e fagioli, if you're feeling fancy.) But when I saw a few versions while cookbook browsing, I was intrigued.


Together, the grains and beans are a complete protein source, making it a tidy meatless meal.

It's a simple two-pot dish. In one pot, cook up some chunky pasta, some shape that can hold its own against the beans. We picked orecchiette, which looks like adorable wee turtle shells. The name actually means "small ear," but the thought of a bowl full of ears squigs me out. I'm sticking with turtle shells.

Meanwhile, get some garlic and onions going in a skillet.


Add chopped greens and cook, covered, for a few minutes. Add beans and basil and cook for a few minutes more.


Toss with the pasta and squeeze a lemon over it all to counter the bitterness of the greens. Although the recipe didn't call for it, we added a little grated Parmesan.

The kids were smitten with the orecchiette. "It's helmets, Mama! Little construction helmets! Like Bob the Builder," said The Boy. "Hats!" cried The Girl. But they diligently picked over every single bean and bit of kale on their plates, so it was kind of a failure in that regard. The new score: me: 1; kale: 1.

The Husband and I gave it a B. Although I liked the touch of lemon in this recipe, we have a version that uses tomatoes that I like better. But it was worth a try.

Recipe below; printable version here.

Monday, June 14, 2010

Homemade refried beans

Since I learned how to cook and freeze dried beans we've pretty much stopped buying canned beans. So much cheaper and no worries of BPA nastiness. But it never occurred to me to make our own refried beans until another blogger mentioned it.

We gave it a try the other month and, holy smokes, I think I'm ruined for canned refried beans forever. Not only was it less expensive to make our own, but they tasted so much better. Now we've got a  few frozen batches stashed away and ready to go the next time burrito night rolls around. A pint container holds about the same amount as a standard can.

I'm still experimenting with some different recipes, but the one below is the one we are using at the moment. It's a mild, plain flavor, just like you want out of your basic refried beans. It suggests smashing the beans with a potato masher, but I like going at them with my immersion blender instead. Much more like the familiar texture of the canned version that way!

Now to figure out how to recreate the green chile and lime refried beans. Mmmm.

Recipe below; printable version here.

Wednesday, March 24, 2010

Cooking and freezing beans

Cooking and freezing your own beans is a double win: you save money and avoid the yucky BPA-lined cans. Woot!

It's simplicity itself--you just boil water--but, y'all, I still managed to mess it up the first time I gave it a go.  Seriously. I put way too much water in the cooking pot, things boiled over, and it was an absolute disaster to clean up. But I forged ahead! And it went much better the next time!

Now it doesn't take much thought at all. The basic formula: rinse, soak, cook, freeze.

Rinse: Pick through and remove any rocks or funky beans (split skins, discolored, shrivelled). Rinse with cool water.

Soak: Most beans need to be soaked before cooking to soften them up. The exception are some of the softer beans: lentils, split peas, black-eyed peas. Put into a large bowl and add enough water to cover the beans by 3-4 inches. Ignore for 6-8 hours.

(If you don't have 6 hours to spare, you can do a quick soak on the stove. Bring the beans and water to a boil, remove from heat, cover and let stand for 1 hour.)

Cook: When the beans are happily soaked, drain and change out the water. For every one cup of dried beans you started out with add 3 cups of water. (Thirsty little garbanzo beans need 4 cups of water per one cup dried.) Bring to a boil, then reduce heat and simmer:
  • Black-eyed peas - 30 min.
  • Navy beans, pinto beans - 45 min.
  • Lima beans - 1 hour
  • Kidney beans - 1-1.5 hours
  • Black beans, garbanzo beans (chickpeas) - 1.5 hours
It's better to undercook them slightly, if you'll be using them in recipes. When they're finished (bite into one if you want to double check), drain and let cool a bit.

Freeze: Pack into pint-size baggies or freezer-safe containers. A scant 1 3/4 cups equals a 15 oz. can. The bean experts say beans keep about three months in the freezer.

Each bean is a wee bit different, but one pound of dried beans makes the equivalent of about three 15 oz. cans, sometimes four. Such a deal!
Related Posts with Thumbnails